2 days ago
Showing posts with label Eleanor Xandler. Show all posts
Eleanor Xandler, Crowdfunded Detective
Posted Friday, August 9, 2013, 9:16 AM
I have been beavering away on Eleanor Xandler for almost a year, which is way longer than I had anticipated. But then, that's also typical of a personal project - we really can't estimate how long these things take when we don't apply a strict deadline, and we're experimenting with new ideas at every turn.
What I had not realised was how long it would take to render certain shots, and how long it would be before the work started to lose its lustre and be a chore. To be honest, it's not a chore yet, but I do wish it was over already.
Couple that with the fact that I am out of work, and have run short of money, I am a bit worried and stressed, which isn't the best environment to achieve high quality work. I spend my nights sleeplessly worrying about the next day and what my immediate future will bring.
So I have decided to experiment with crowdfunding. One of the biggest problems that my filmmaking mates and I face when we have an idea for a project is where the money will come from. Each one we do is more ambitious and expensive than the last, and we haven't found even one single source of outside money in all that time. We're trapped into the lowest of budgets, and we need to find a way out if we're going to get anywhere with this.
There are two main sites for crowdfunding that most people know about. Kickstarter is mostly American, and has some restrictions for international projects, but it is by far the more well known and more successful, in itself and for the projects it showcases, which include such diverse projects as manufacturing and charities. Whereas IndieGogo is international-friendly, and has a more of a small-time feel to it, with a particular emphasis on art projects like films.
I figure it's worth a try. If it succeeds, and I'm only starting relatively small at $5000, then not only will it encourage us for future projects, but it's a good one to hold up and say "look what we did, look what we want to do" and bring any funders from one along to our others. It could potentially be huge. More likely it will be mediocre. Fingers are crossed for either.
When I Have An Idea, I Stick To It
Posted Wednesday, April 24, 2013, 10:36 PM
There's a risk when you get onto your film set, that you adhere too closely to the ideas you have had churning in your head for so long. Once you've decided that you want, for example, a shot of the actor's feet, a pan up to their waist where they are holding an object, and then up to their head where they have a steely glint in their eye before they exit out of shot, you are determined that you will get that shot by hook or by crook. So you build a rig for your camera that can make the move, you position your actor in just the right angle, you wait for the sunlight to be perfect, your camera operator practices the shot over and over, until finally you film it... and it ends up looking a bit wobbly, out of focus, and you can't even see who it is and what's going on. The shot you thought was going to be so cool turns out to be crap, a waste of time that never makes the final cut.
You have to go onto set with alternative plans, an open mind, be prepared to change everything at the drop of a hat. An idea, perhaps suggested by the location, the time of day, or a whim that your first assistant makes up on the spot, could mean your entire morning is rearranged to accommodate for it. If it's a better idea, then be ready to drop everything and go for it.
A few days before going on set for my Steampunk short film, Eleanor Xandler: Temporal Detective, I drew up some storyboards of about half the shots I had planned. Each one also was intended to have a close up and a wide, and additional shots from the 'B' camera, but broadly the plan was for them to stay the same angle with the same action as I had boarded.
Here are some of the completed shots alongside their storyboard. It just goes to show, when I have a good idea, I stick to it.
Layer Upon Layer Upon Layer
Posted Sunday, January 13, 2013, 12:10 PM
I first saw Photoshop when it came free on a coverdisc on a magazine and my friend Dion installed it on his PC, back in the early 90s. He thought that I, as an artist, would find it useful to create some of the artwork required for our little projects. But after opening it up I was mightily confused. This was probably version 2.0, and it did not come with a manual (before the Internet, before PDFs, physical books were the only way manuals were provided). I was completely lost by the multitude of buttons, tools, menus, and icons. Where do I even begin? So for the first couple of times I scribbled colourful swirls and then just sat there. I couldn't figure out how to do straight lines, the mouse had no easy way to draw like a pen, and so clumsily I moved the pointer around a few times, achieving nothing.
It was about five years before I opened up Photoshop again. I had just been hired as a website designer for the first time, and I was completely new to the specifics of that job. I was hired solely on my artistic abilities and my familiarity with computers, but had no specific experience with HTML or Photoshop graphics. So I was allowed about two months just to familiarise myself with both those things.
Now I had a purpose for using Photoshop. I was given a Wacom drawing tablet, and with a goal in mind could go through all the steps to achieve an image. How do I create a box with round corners and highlighted edges? How do I create a drop shadow, a gradient, or coloured text? This was version 4.0 of Photoshop, so certain things did not exist yet - no multiple Undo, no auto dropshadow and glow (known as Layer Styles), no Batch Actions. But I had a manual, I had a few excellent quality guide books, and a mailing list of Professionals including some Adobe employees, all of whom were really helpful.
And the key to using Photoshop effectively is understanding layers. Unlike drawing or painting, where you're stuck with a single sheet of canvas or paper to just pile stuff on top of itself, with Photoshop you have individual layers which you can move, erase, recolour, distort, fade transparency; an infinite amount of adjustment, for each individual small part that you choose. It's a fantastic way to create.
Over the years I've learned a lot more about Photoshop, that there are multiple ways to achieve the same thing, that each subsequent version adds features that make some jobs a lot easier, it integrates better with Adobe's sister-products, and evolves and adapts to be useful for new technologies.
And one day I had to learn to use another of Adobe's products, called After Effects. When I first used it, I didn't understand just how powerful it could be. It seemed like a fewer-featured Photoshop. But in fact its role, to composite different video elements together for Visual Effects, requires such specific tools that comparing it with Photoshop is futile. After Effects is its own thing, and arguably even more powerful.
But one similarity, that it uses even more effectively than Photoshop, is its use of Layers.
I am slowly working my way through each shot for my Steampunk short film, "Eleanor Xandler: Temporal Detective," mostly in chronological order, and have just completed one of the most complicated shots of them all. And that's because it's a shot I didn't actually film on the shoot day. I realised, after looking at the rough edit, that there were a couple of shots that I really needed in order to transition from one shot to another effectively, and I had not thought ahead enough to have filmed those shots, so I wondered if I could make them up using what I could find amongst the clips I had.
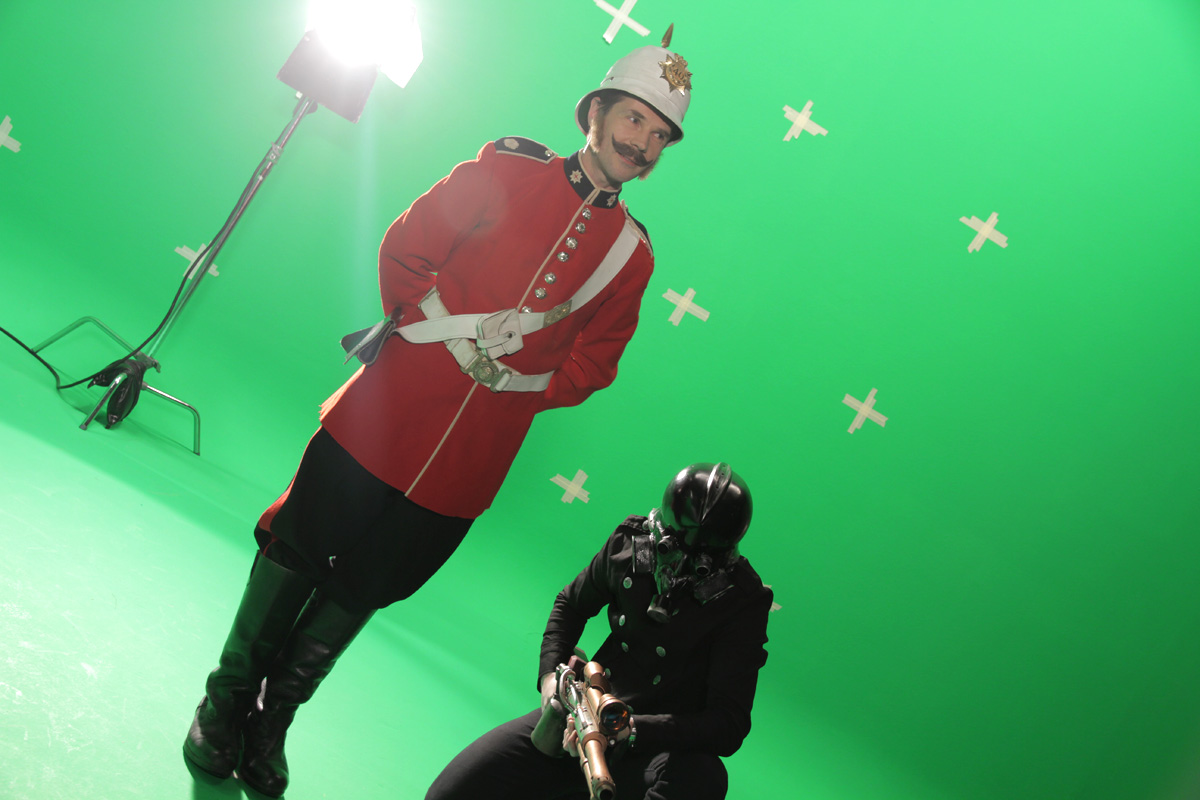
One particular shot was from after I had called "Cut!" and the actress playing Eleanor, Sarah Breen, looked over to me to check if I was happy. That glance was all I needed to convey what was required, so I had now found my missing shot. Simple. But there was another shot I needed that was vastly more epic, and luckily this is where shooting on greenscreen, and having plenty of Behind-The-Scenes photography, each come in handy.
I wanted an Establishing Shot, one that shows the audience the location where the scene takes place, and orients them to where the characters are standing in relation to each other. I hadn't thought to film such a shot, because in my head I knew where everyone was. But that's not good enough, because of course I know, it's my story. I know plenty of things that the audience do not, it's my job to make sure all of those things are conveyed where necessary, be it through dialogue, performances, or editing. So now I had to create a shot that told everyone where my two characters were actually standing.
And where they're standing is in a huge dark smoky warehouse, filled with junk and decorated by 1880s style structural architecture. I had to create an over-the-shoulder shot of Eleanor entering through large doors, pointing her weapon at the Professor who was at the far end of the building, all while showing off how large and beautiful the warehouse was.
The warehouse 3D model had already been built, as an exterior and in preparation for all the interior shots that I was going to composite, but only in a limited fashion. Only build what you need, as anything more is just going to slow down the process. Well, now I had to expand on that, as this additional unplanned angle meant more of the warehouse would now be seen. I added in extra features, including a spiral staircase, an extra wall, a couple of piles of junk, and additional detail on the interior skylight roof.
During the shoot I had a B Camera, which is a second camera recording the shots from different angles and framing, giving me extra footage I can cut to should I need it. One of those shots was almost an over-the-shoulder of Eleanor, except from the wrong side, and that section of it was only 30 frames long. I needed 100 frames at least, but I clipped the shot out, flipped it to match the angle, and then stretched and reversed the shot a couple of times to extend its length. This can sometimes be glaringly obvious, I've seen reversed shots in feature films before and there's a few physics giveaways that you can spot sometimes (a turn or a blink in reverse looks slightly peculiar) so in order to hide the trick I made sure the part of the shot that was Eleanor would be completely out of focus with the depth of field.
In the far distance is the Professor. None of the shots I had of the Professor were full length, they all cut off at his knees or higher. Extremely luckily there was a single photo taken amongst the Behind-The-Scene images which included the Professor's legs, so I grabbed that, flipped and scaled them to match, and then animated them to match his movement, which wasn't much but still had to be done.
Unfortunately the angle of the Professor shot didn't match the perspective I needed, which was most obvious with the Console Panel he was standing at. So I had to replace the console with another BTS photo, which meant I had to cut around the Professor's arm (a technique called Rotoscoping) so that it looked like he was manipulating the controls accurately. The side of the console prop also has no surfacing, so I had to fill in that blank as well.
The warehouse is full of smoke, steam, and dust, because this is Steampunk and that's what the goggles are for, so I had to layer in not just multiple instances of atmosphere, just like if there had been a smoke machine on set, but I also had to include the shafts of sunlight that came through the door and skylight.
Couple all that stuff with the camera move, which is a pan down from skylight to Professor, that I had to track and match, it makes for a very complicated shot that should, in viewing it, go by quickly and seamlessly, and convey exactly what I wanted, that the space of the building is so big, and this where the characters are standing.
Evolution of an Airship
Posted Friday, October 26, 2012, 11:20 AM
When I decided to make my first short film, Eleanor Xandler: Temporal Detective, I knew immediately I would have to film the entire thing on greenscreen. I wanted to have real locations, but that was just so difficult and complicated to achieve as they had to be so specific in their look, and there was at least one part of the story that had to be on greenscreen anyway, that it made sense to just shoot everything in one place and fill in the backgrounds later.
There are flaws with this approach. When it's been done before in the past it has had a spotty success, and this is from professionals who really know what they're doing. Films like Sky Captain, the Star Wars prequels, Lord of the Rings, and King Kong, all have at least some greenscreen in every single shot, and a few environments that are entirely digital from top to bottom - and yet, to me, it's somehow glaringly obvious. Something about the compositing, the lighting, the staging, the artificiality, I'm not sure what, gives it away, at least to me. Even Avatar was convincing only a few times.
This gives me hope. My compositing skills are not ever going to be at professional level quality, but as, apparently, that can be a bit dodgy at the best of times I am in good company.
The first artificial background I have begun creating is for the opening sequence. I figure chronological order is as good a place to start as any. This means a cloud-filled sky, and a Steampunk Airship called The Wandering Star.
My first image is crude and simplistic. That's because I quickly slapped this model together in less than an hour, as a guide to show the cast and crew what we were filming. It oriented them somewhat, and gave them something to imagine was surrounding them as they stood in an endless sea of green.
After filming was complete I began to model the final version, carefully going through it step by step to include as much detail as I could. My normal approach to 3D modelling is to be a bit slapdash, to save time, cutting corners where things won't be seen, trying to find short-cuts to achieve the look I'm after. But this time I couldn't afford to be so cheap with my attention, and tried to give the model all the detail it needed, even if it meant hours of just pushing points around in a mundanely dull fashion.
The above image is a good start, but notice on the image below that there is an adjustment between the two. The windows are bigger, the railing is thicker and closer spaced. That's because I realised the scale was wrong.
I imagined the Wandering Star as a two-person vessel, that being Eleanor and her robot pilot Gadzooks. Therefore space to move could be minimal. She's not going to be playing Shuffleboard on the Lido Deck, after all, but she might have a passenger. I adjusted the scaling to a more logical size, from 25m down to 16m long. This is not only more realistic a scale, it also means she doesn't get too tiny in the shot when the framing shows the full profile of the airship.
I then added in the water tanks. Being steampunk, there needs to be steam. That means a lot of coppery brassy tanks and pipes and whatnot, so I put in the engines that drive the propellers. I also bought a plugin for Lightwave, a handy automatic rope generator that allows me to concentrate on the placement of the rope in a simple string, and it automatically fills in the twisty detail. The ropes do make the model polygon-heavy, which causes a bit of a slowdown, but it's well worth it. They add a level of realism that brings it to life, especially when twisted around the block-and-tackle.
Texturing is a complicated procedure, something I've never been very good at. You have to adjust so many factors to get things looking right that it gets bogged down in maths and angles and trickery that I frankly struggle under the weight of. Colour, diffusion, specularity, reflectivity, occlusion, transparency...
The brass and deck textures are relatively straight forward. Brass wraps around everything evenly, so it just has to be a golden metallic colour applied on all things I have deemed should be brassy. The deck is flat, and can have the texture projected directly from above. But the rest of the objects all have UV maps.
UV maps are when you unwrap an object, especially one with an unusual shape, so that it lays flat within a square page. That way you can apply the texture as a 2D image and it will apply itself to each individual polygon consistently. If you then subsequently move, rotate, or scale the object the texture remains fixed where you want it. But unwrapping each object into its UV shape is fiddly work. The weird shape of the airship's hull means I have to wrap a wooden plank texture that follows the curvature logically, with no distortion or irregularity. Laboriously adjusting the UV point by point is the only way to achieve that.
As I continued to apply the textures one by one I adjusted the model to fit. I'd suddenly have an idea of what should be wood, what brass, to give it that industrial elegance that steampunk requires. The rudder, for example, I was looking at in its plain wooden state and just thought it looked boring. So I added a brass strip and some bolts. Then another. Then some hinged joints. And some cog gearwheels. Suddenly it looked like it actually operated in a mechanical way, something quite elaborate yet logical. I am now tempted to adjust some of the other parts of the ship to match...
This is the final model of the ship, from the angle it will be seen most often, and in profile as it will rarely be seen at all.
Someone pointed out to me that the placement of the balloon causes an apparent imbalance that would make the rear of the ship topple backwards. But hey, it's science fiction. Technically the balloon isn't big enough to lift the vessel at all. I moved the balloon that far forward to give a sense of speed and dynamism to the design of the ship, though most of the time you won't see the ship from that side and it won't look quite so awkward in motion. But if it makes you feel any better, imagine there's a heavy counterweight in the forward hold.
There are flaws with this approach. When it's been done before in the past it has had a spotty success, and this is from professionals who really know what they're doing. Films like Sky Captain, the Star Wars prequels, Lord of the Rings, and King Kong, all have at least some greenscreen in every single shot, and a few environments that are entirely digital from top to bottom - and yet, to me, it's somehow glaringly obvious. Something about the compositing, the lighting, the staging, the artificiality, I'm not sure what, gives it away, at least to me. Even Avatar was convincing only a few times.
This gives me hope. My compositing skills are not ever going to be at professional level quality, but as, apparently, that can be a bit dodgy at the best of times I am in good company.
The first artificial background I have begun creating is for the opening sequence. I figure chronological order is as good a place to start as any. This means a cloud-filled sky, and a Steampunk Airship called The Wandering Star.
My first image is crude and simplistic. That's because I quickly slapped this model together in less than an hour, as a guide to show the cast and crew what we were filming. It oriented them somewhat, and gave them something to imagine was surrounding them as they stood in an endless sea of green.
After filming was complete I began to model the final version, carefully going through it step by step to include as much detail as I could. My normal approach to 3D modelling is to be a bit slapdash, to save time, cutting corners where things won't be seen, trying to find short-cuts to achieve the look I'm after. But this time I couldn't afford to be so cheap with my attention, and tried to give the model all the detail it needed, even if it meant hours of just pushing points around in a mundanely dull fashion.
The above image is a good start, but notice on the image below that there is an adjustment between the two. The windows are bigger, the railing is thicker and closer spaced. That's because I realised the scale was wrong.
I imagined the Wandering Star as a two-person vessel, that being Eleanor and her robot pilot Gadzooks. Therefore space to move could be minimal. She's not going to be playing Shuffleboard on the Lido Deck, after all, but she might have a passenger. I adjusted the scaling to a more logical size, from 25m down to 16m long. This is not only more realistic a scale, it also means she doesn't get too tiny in the shot when the framing shows the full profile of the airship.
I then added in the water tanks. Being steampunk, there needs to be steam. That means a lot of coppery brassy tanks and pipes and whatnot, so I put in the engines that drive the propellers. I also bought a plugin for Lightwave, a handy automatic rope generator that allows me to concentrate on the placement of the rope in a simple string, and it automatically fills in the twisty detail. The ropes do make the model polygon-heavy, which causes a bit of a slowdown, but it's well worth it. They add a level of realism that brings it to life, especially when twisted around the block-and-tackle.
Texturing is a complicated procedure, something I've never been very good at. You have to adjust so many factors to get things looking right that it gets bogged down in maths and angles and trickery that I frankly struggle under the weight of. Colour, diffusion, specularity, reflectivity, occlusion, transparency...
The brass and deck textures are relatively straight forward. Brass wraps around everything evenly, so it just has to be a golden metallic colour applied on all things I have deemed should be brassy. The deck is flat, and can have the texture projected directly from above. But the rest of the objects all have UV maps.
UV maps are when you unwrap an object, especially one with an unusual shape, so that it lays flat within a square page. That way you can apply the texture as a 2D image and it will apply itself to each individual polygon consistently. If you then subsequently move, rotate, or scale the object the texture remains fixed where you want it. But unwrapping each object into its UV shape is fiddly work. The weird shape of the airship's hull means I have to wrap a wooden plank texture that follows the curvature logically, with no distortion or irregularity. Laboriously adjusting the UV point by point is the only way to achieve that.
As I continued to apply the textures one by one I adjusted the model to fit. I'd suddenly have an idea of what should be wood, what brass, to give it that industrial elegance that steampunk requires. The rudder, for example, I was looking at in its plain wooden state and just thought it looked boring. So I added a brass strip and some bolts. Then another. Then some hinged joints. And some cog gearwheels. Suddenly it looked like it actually operated in a mechanical way, something quite elaborate yet logical. I am now tempted to adjust some of the other parts of the ship to match...
This is the final model of the ship, from the angle it will be seen most often, and in profile as it will rarely be seen at all.
Someone pointed out to me that the placement of the balloon causes an apparent imbalance that would make the rear of the ship topple backwards. But hey, it's science fiction. Technically the balloon isn't big enough to lift the vessel at all. I moved the balloon that far forward to give a sense of speed and dynamism to the design of the ship, though most of the time you won't see the ship from that side and it won't look quite so awkward in motion. But if it makes you feel any better, imagine there's a heavy counterweight in the forward hold.
More Punk, Less Steam
Posted Tuesday, September 4, 2012, 9:56 PM
It was a long time coming. I have helped out on other films for the last twenty years, off and on, in both small and large capacities. An aborted attempt at helming my own a few years ago discouraged me a bit, but at long last I finally committed to an idea that really spoke to me as being a decent bit of fun, and last weekend I went ahead and directed my very first film shoot.
Leading up to the shoot day I was not at all nervous, and that surprised me. I was concerned that I'd forget something, and I wasn't entirely confident that people would listen to me and do what I ask of them, but it turned out those worries only led me to take extra care and do things right. By knowing my film sideways and backwards I had a clear picture of what I wanted, which meant I could answer questions with precision, and present myself as confident and focused. That seemed to cause everyone to respond, and led to a fast shoot, a fun day, and a creative atmosphere.
It did help that most of the crew were already friends of mine who trusted me, but there were a couple of other things that really helped me along. The costume design by Alex Chambers of Clockwork Butterfly was exquisite, and the props built by Adam Gill were perfect. That combination, when seen on my actors Sarah Breen and Phil Zachariah, as they recited their lines in the first takes, brought my vision to life, and everybody on set could see now what I was trying to create. It proved to them, and more importantly to myself, that I could do this.
I was on my feet all day. Every time I sat down, not two minutes later I was called away to something new. I had to prepare a few shots ahead at every step, I had to make sure all my crew were doing what they needed to do, knew what they needed to know, and were as busy as they needed to be, to keep them alert, interested, and informed. And it seemed to work.
I had a lot of fun, and it was strangely compelling to be in charge, something I've never felt comfortable with in the past. I think in my heart I am a co-Director, and would also love to be a co-Writer, but stepping up to the plate to take full charge is now something else I think I can do occasionally.
I will be editing a rough cut of the footage over the next couple of weeks, and then preparing the assets for the backgrounds over the coming months. A greenscreen shoot means every single shot has to be composited in, and that's potentially fifty different images and animations. It sounds like a lot, but really it's only three distinct "locations" I have to build - the airship, the exterior of the building, and the interior of the building. There are a few additional special effects like the Time Vortex and the weapons powering up, but they'll be relatively straightforward I think.
It's all in hand. I am confident I can do everything I have set before me, and have people to help when it starts to get complicated or falls into zones I'm less familiar with. This is finally happening.
More Steam, Less Punk
Posted Sunday, June 17, 2012, 10:53 PM

Based on the Jules Verne, HG Wells, Edgar Rice Burroughs era of adventure stories, it stems from a time when steam, clockwork, and airships dominated technology and therefore influenced their futurism. Aeroplanes, cars, and computers weren't easy for the writers to imagine, so they tended to just extrapolate from what they knew. Now it comes across as antiquated, but nonetheless quite stylish, and the naivete of their predictive tales have a compelling charm.
The key element for modern Steampunk adventure seems to be entirely aesthetic. You have to get the look right first, then after that the story fits within. The plot doesn't necessarily have to revolve around steam, though the limits of the technology of the time can play a part. But even that doesn't always apply, as new tech will have evolved to fill in some gaps. So you might have a road vehicle of sorts, but it will travel at 30mph and need a refill of coal instead, or there may only be airships, but they're small, efficient, and as manoeuvrable as a helicopter.
Many times I have thought about how I'd do Steampunk, given the opportunity, and I have devised a base that I think it would need to follow on from. First, the internal combustion engine doesn't get invented, so that means the aeroplane doesn't get invented either, nor cars, diesel or electric trains, and any sea-going steamships are limited in speed.
Then what if WWI doesn't occur. That would mean certain changes in attitudes that happened after are no longer initiated; which would be compounded further if there were no WWII either, as it was an era where views on equality and racism started to change. So if those huge world events never occurred, that would mean many old-fashioned attitudes would still linger.
But having said that, if we were to set the story in our own current year, via a Steampunk history, there would still be sociological development, and a certain amount of modern attitude would inevitably happen no matter what was different in the recent past, which opens up the world to strong-willed dynamic female characters, even if a lot of sexism still remains.
Also, a steam and coal based history means we still need to utilise horses for much of our transport needs, and therefore cobblestones would remain common. The smoke would cause all sorts of havoc to the climate, forming a thick grey cloud layer, leaving a grimy scum on water and every other surface, and an acrid everpresent stink of smoke and oil.
People would therefore dress accordingly, hence the prevailing popularity in Steampunk of thick wool and leather coats, goggles, and sturdy boots. The adherence of a Victorian fashion sensibility doesn't necessarily make sense unless you keep the story set in the era of the late 1800s or early 1900s, so many stories remain in that era, but my approach of no World Wars, which had sparked such changes as trousers for women, and fabrics developed for comfort and practicality, would explain why those never develop in my Steampunk universe.
A year or so ago, I was thinking about what it would take to make a short Steampunk film, and the problem that stopped me from proceeding was the need to find a lot of very specific stylish costumes for the characters, and very specific kinds of locations that would require a lot of props and expensive set designs.
But having recently completed a lot of 3D backgrounds for a short film that was shot entirely on greenscreen, the realistic results buoyed me somewhat and convinced me that we don't always need a real location to achieve a believable quality image. And as time goes on and our skills and equipment improve it only gets easier.
As much as real locations always look better than anything wholly artificial, I believe that if I do it right I can create something believable enough we can get away with it. Shadows, depth of field, and a great foreground to draw the eye will help hide the digital nature of our sets.
And so I have decided that my next production will be a Steampunk short film. We've already begun pre-production. I will be Directing, my first time at that most important of roles. In the past I've only ever been anonymous crew or post-production. I have sort of semi-co-Directed with my mate Rob on some little productions, but really it wasn't much more than as an assistant-poke-my-nose-in with no real responsibilities to stress me out, so this will be a whole new experience for me. I have tried to Direct once before, but I was discouraged by the rigmarole of preparing that shoot, things just never worked out the way they should've. Locations are harder to find, not only because people demand some kind of money for the use of them, but also the higher restrictions on what you can do and where you can go, due to the weird paranoid privacy issues that have evolved in the last decade.
This time, though, not only am I more confident with my own vision, I have already figured out how to work around the usual stumbling blocks we may encounter, by having a minimal number of actors, no live locations, a controlled environment, and a very short and simple shot list. I have every confidence this will work out very well.
I hope.